
We might be having restricted time with our horses and may not be able to ride, but we can still take photos of them and if you can’t visit your horse you can still try these tips out on your dog or family members. Here are some of my top tips to help you take better photographs, I’ll be expending on these and offering more advice over the coming weeks:
Horses are beautiful, there’s no doubt about that. With such graceful creatures it should be easy to get an amazing photograph…. So why do so many snaps fall short of expectations?
I have had the pleasure of working with many horses in my life as an equine photographer. They make stunning subjects for a photograph and a photo shoot with them can easily create stunning pieces of photographic art.
However taking photographs of horse presents many difficulties and so here I offer some of my top tips to help you get the best results. You don’t need a fancy camera to follow most of these tips. Nor do you need to spend hours learning how to edit photos. You just need a bit of time to practise and some patience.
Safety
Let’s get this first on the list. It may be your horse or someone else’s that you know well that you are taking pictures of. However, as well all know, they are unpredictable animals and you may well have lots of expensive equipment on you. Please don’t try to lead your horse when your hands are full with a camera. Also be aware that if you have a camera up to your face you will not be as aware of what is going on around you as you normally are. Be extra careful if you are in a field with more than one horse.
Be ready for sudden moves. Don’t put yourself or your models (horse or human) in a position they are uncomfortable with that may scare them. Check the horse is happy with the noise the camera makes whilst they are tied up. Alternatively ensure someone has a firm hold of them before you start snapping away. It is rare to find a horse that reacts to the click, but not unheard of. If you are going to use flash (and yes you can with horses – but I don’t have room here to cover flash techniques) again do the same and get the horse used to it. Most of them will settle fairly quickly.
Lighting
We can’t control the wonderful British weather. If only we could all take pictures of our horses in the sun they crave so much.
But, if you can, do think about the weather on the day. Slightly overcast but bright days are the best for getting an even picture with no harsh shadows. Horse’s ears are long and can create some interesting shadows across faces, as can rider’s hats.
Rain is generally a no-go. If it is raining on the day of my shoots I postpone to another day as soggy horses do not make the best pictures. But if you’ve got no choice please put a plastic bag over your camera/phone leaving just the lens uncovered. Plus keep the lens free from raindrops and you can snap away. Wind can put the horses a bit on edge – but makes for some great movement in photos.
Cleanliness
If you are planning on taking shots of your horse or having a professional shoot done, make sure that the horse and all their tack are clean. This includes making sure any headcollars etc you might use are in good condition. It’s really easy to ruin that photograph of a lifetime – your horse cantering through the field – with a tatty-edged webbing headcollar. Unless you are a photoshop genius you will never get rid of it. Plus, please think about eyes and ears – it’s easier to get rid of bogeys before you take the shot than afterwards.
Colour
Think about the colours your human models are wearing in relation to the horse and the colours the horse is going to wear too.
Red works well in almost all cases. In fact red is a photographer’s trick colour, it is often used to make photos ‘pop’ and look more appealing. Bright colours in general are a good idea. If possible avoid white – it is very easy to overexpose white on a photo and so can make getting the balance of brights versus darks very hard.
Assistant
If you can consider having an assistant with you, maintaining good social distancing of course.
If can help is someone holds the horse (whether they are in the photos or not) – this assistant must be comfortable and in control of the horse. Or maybe they can stand at a good distance behind you and shake a bucket, flap a towel, chuck a packet of crisps around – basically anything that will get those ears forward.
Technicals
Not everyone has an expensive camera, and you don’t need one to get nice photos if you follow most of these instructions. But if you do have a DSLR/Bridge Camera or even a phone that is v good for photography then read the below two paragraphs.
I could write a whole series of articles on what settings you need for your camera for what particular shots and light conditions – but it’d bore most of you and probably me as well. So here’s one simple rule for when you are first starting out… If you can, put your camera/phone into ‘sports’ mode – the one where you hold the button down and it takes lots of shots in quick succession. Then point the camera at the horse and whenever you think it’s a possible good shot, press the button and take three or four shots.
Now I know the camera purists out there will be tutting and talking about waiting for the right moment in the stride or until everyone is ears forward, eyes open and stood still, but with modern digital cameras you can afford to take a few hundred shots in a day and delete the ones that don’t work when you look through them. We aren’t all quick enough to get that perfect moment, so don’t be afraid to take more shots than you think you’ll need. Be very snap happy and you should have some shots where you’ve managed to get your horse without his tongue out shaking his head!
Do think about where the sun is in relation to your subject and use it to your advantage. To light a horse up make sun it is behind you and not the horse. However don’t be afraid to experiment with the sun. Take some shots with the sun behind the subject as well – you can get some lovely effects.
Composition
This is perhaps the hardest to explain, but really does make all the difference between a ‘snapshot’ and a stunning picture.
Firstly think about what is in the background. You don’t need the rolling hills of Yorkshire (though I’m lucky enough to have them on my doorstep). Mostly all you need is a hedge or a wall. Just try to pick a spot where there are no old barrels, jump stands, tractors etc… in the background. Things that are brightly coloured, for example traffic cones, will be distracting to the eye – so move them, move the horse or be prepared to take them out of the photo in post -editing.
Use the rule of thirds. You might have heard this expression before and it is a useful one to think of in equine photography. The instinct when you take a photo is to put the subject right in the middle – and in some cases this is the best thing to do (formal showing shots for example). But don’t be afraid to place the subject a third of the way in from the side of the photograph. It gives the effect of allowing the subject ‘more room to move’. Also think about which side to place them on – if possible have more room in front of the direction of movement than behind.
One final thing on composition is size. Try some shots with your subject far away, try some with them close up. Remember it is often easier to move the photographer than the horse. Also think about the size of the photo afterwards – do not be afraid to crop the photo and change the dimensions. There are loads of free online editing apps that you can do this with. For example a letterbox shape can look great on a cantering action shot.
Perspective
Unless you want a comedy shot (and they do have their place) then you need to think about where you take the photo from, in relation to the horse.
If you take a picture sitting on the ground you will elongate the horse’s legs, if you take the picture looking up the horses nostrils they will have a big nose and small ears. Also if you take the shot from behind they will look to have a bigger bottom and if you take it head on they will have a big head. This is due to the size of a horse – it is a lot of animal to get into one lens.
If you have the luxury of a zoom lens the rough rule is that you will get a truer perspective if you take the picture stood further away and zoom in than if you stand close and zoom out. There’s a lot of complicated science behind that, which I don’t want to get into – but trust me it’s true.
A key consideration that most people don’t think about is height – and that means your height when taking the photo in relation to the horse’s height. To get the best perspective you want to be roughly level with the horse’s barrel, so if it’s a small pony or your champion foal you need to bend down. Incidentally if you have a dog – try this next time you take a picture of it – get down to their level (even laying on the floor if required) and you’ll get better shots.
If you want to ‘improve’ your horse‘s confirmation in a photo then perspective is key. Want a slightly bigger bottom? Take the picture side on and slightly from behind, or the horse walking away from you. Want to make sure the horse looks ‘up in the whither’? Cheat and stand it on a slight hill facing up the hill. Whatever you do try to avoid taking pics of a horse standing facing downhill, high back-ends and down in the whither shots don’t please anyone. Do think about perspective – but don’t be afraid to play around with it for fun.
Details
Think about the details… When I do photo shoots for customers I always zoom in and get shots of small details.
These photos can look great as part of a collage in a frame, photo book or a series of mini-canvases. So take your time and think about the little things, you don’t need to the get the whole horse in every shot. Take a picture of the horse’s eye, it’s muzzle, a fancy buckle or tassel on the bridle or a detail of the handler’s outfit. These more ‘arty’ shots are always popular at my photo shoot viewing sessions. But beware of reflections in horse’s eyes as you may find yourself with camera/phone looking back out of the photo.
I hope that you bear these factors in mind next time you are taking a picture. Please do try them out and see if you get better photos as a result.
I’m not promising you will be David Bailey straight away – but give it a go. Don’t forget to have fun with it and most importantly if all else fails do remember a professional photoshoot is always fun and once this is all over I can help you out with that.
Top 5 Tips
Sun – think about positioning the sun behind you to light up the horse
Thirds – place the horse or rider a third of the way into your shot
Details – use closer in shots to highlight what you like about your horse
Practice – take lots of shots and weed out the rubbish afterwards
Safety – be careful out there
Author
Katie Amos is a horse and dog photographer based in Todmorden, West Yorkshire. Her days are spent on private commission work for clients – taking photographs of them with their animals at home or on their yards. She also works for a number of equestrian brands creating images of their products for websites and brochures. Katie has her own dressage horse Otto and a rescue dog Holly. You can see Katie’s work at www.equineshoot.com
Follow us
Recent Posts
 The real cause of seasonal itching in horses2 July 2026Why some horses still itch despite doing everything right The frustrating reality You’re feeding ...
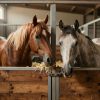 Why AI is now the biggest marketing challenge for Equestrian Businesses30 June 2026What Horse Owners are asking ChatGPT instead of Google, and why it matters for your business” ...
 When is the best season for buying a horsebox19 September 2025Beating the Spring Rush! As the autumn leaves begin to fall and the days grow shorter, many horse ...