
Drawing a horse – as easy as 2,4,6,8
By Ruth Buchanan
Have you ever wanted to try drawing a horse?
I am often told that I am lucky to have such an artistic gift or talent, but I can assure you that while I had the spark of creativity from an early age, the talent and gift is the will to pursue and nurture that. I firmly believe that anyone can draw if they have the will to try and then stick with it, and that the act of drawing is beneficial in many more ways than just producing a pretty picture. Drawing is good for manual dexterity, spacial awareness, is a memory enhancer, and a tool for seeing and understanding the world. In short, a contributory skill to almost any human endeavour and a vital part of our learning.
So what drawing skills and resources do you already have?
The skill of ‘Learning to Look’ is a key factor in drawing. As horse owners, riders and trainers we are used to looking and assessing horses for conformation and lameness. Drawing draws on those skills (no pun intended), but also helps to develop them. Putting lines and marks down on paper is obviously what most people think of when they consider drawing, and we all have those skills and practice them daily when we write letters and numbers, or even when we just doodle. Prevarication is easy: “I don’t have the right materials”; “I don’t have time”. Well we all have more time at the moment and it is an opportunity to explore another skill, just to have fun with drawing or as a very early form of ‘mindfulness’. Getting lost in a drawing is akin to the ‘zone’ I escape to when schooling my horse. You may think you need a photograph to work from, but you can do this type of drawing without reference materials. Once you get the hang of it you can use the techniques to help you work from a photograph, or for sketching horses in the field or stable, with more confidence.
A note of caution: a camera does not see in the same way as our eyes, and the angle from which you take the photo and the type of lens can distort the image. The chief culprits for distortion are smartphone cameras as they have slightly wide-angle lenses. That is why when you take a photo of a horse facing you, the head often looks too big and the back legs look tiny. Learning the basics can help you see and avoid replicating those distortions. For materials, any pencil or pen will do (try not to resort to using an eraser until the very end) and if you don’t have a sketchbook, then a sheet of printer paper or a piece of cardboard packaging will do. It might even be better, as you won’t be thinking of ruining an expensive or ‘proper’ substrate (that’s a fancy art-word for the surface you are working on). I draw on brown postage paper, the back of wallpaper roll ends, old receipts, opened out cigarette packets and even beer mats. My farrier and I have had competitions as to who could draw a horse’s hoof the quickest, using chalk on the concrete floor of the forge! I mourn the loss of paper feed bags as they were great (and free) drawing materials.
The most important resource you have is the attitude of ‘just having a go’, even if the idea is as scary as jumping that log that you keep seeing when out hacking. Fear of failure is what stops us, but focusing on the process rather than the product is what is important here. It is more about getting engrossed in drawing, and how it makes you feel, rather than achieving perfection from the first attempt. Like jumping, the confidence will come with practise.
There are many ways of drawing, but I will demonstrate a simple method to get you started, and you don’t even need a photo to copy. This demonstration is about using skills you already have and using those to gain the confidence to make marks and lines.
Where to start?
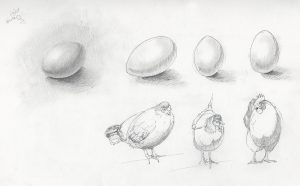
The hardest thing is the first mark, so let’s start at the very beginning with drawing by numbers. I remember an aunt showing me how to draw a duck or swan when I was a child. She drew the number 2, then made it into a bird. You can do the same sort of thing by drawing an angled 0 or an egg shape as a start for the body, and then you have an answer for the question ‘which came first the chicken or the egg?’
The horse is a more complex shape, but I have come up with a way of drawing a stylised horse starting with a combination of the numbers 2,4,6,8 and 0. Let me demonstrate.
Drawing By Numbers
Stage One

Let’s start by drawing a 2. Your first attempt may not be very expressive (my first 2 is shown in the box at the top of the sheet). So, try again making the foot of the 2 longer and more flowing. Kick-on and see how expressive you can be. Think of the flow and rhythm of a beautiful extended trot, or a perfect jumping bascule and fill your sheet with numbers. Draw BIGGER. This is a good warm up. We warm up our horse before a schooling session, so why not warm up our arm (and mind) before drawing?
Stage Two
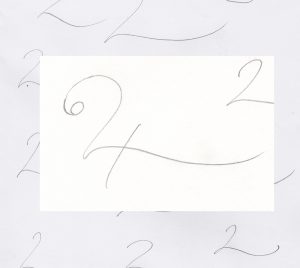
Now you have a choice of 2s to work from, or you can draw another, bigger version. Let’s make the stem and foot of the 2 into a 4, and extend the head of the 2 into a 6. I chose the 2 in the middle of the sheet and have enlarged my choice to make it easier for you to see. Stick with me – it will make sense in the end!
Stage Three
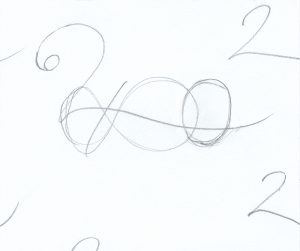
Now turn your drawing ninety degrees clockwise and draw an elongated 8 around the foot of the 2/4. If you find it difficult to elongate the 8 your horse might look a bit short-coupled, so turn your picture back to straight and add a 0 behind the 8. This can overlap the bottom of the 8 or sit completely behind it – experiment and find what works for you.
Stage Four
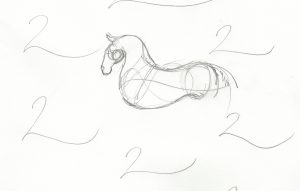
We have now gotten rid of the scary blank sheet of paper, and have the basis for a horse’s body. All we then have to do is sketch our horse using the 6 as the base for the horse’s cheek and the crossbar of the 4 as the angle for the shoulder.
Stage Five
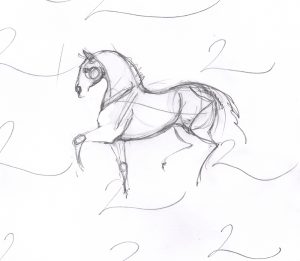
We can use more numbers to add the legs. I used 7s for the hind legs and 9s for the knees and lower front legs. You can also use backward 7s for the front legs. I find it useful when drawing the hind legs to add another 7 for the angles of the pelvis and thigh bone (femur) ending at the stifle before drawing another 7 to the hock and then the fetlock. Just then connect these other numbers to the body. I also tidied up some of the other drawing – the numbers are just a framework to make a start, so we can change them as much as we want as the drawing progresses.
Now we can start to play!
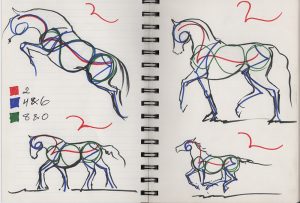
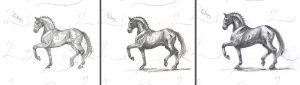
When you get more confident, you can start to change the angles of the starting 2 to draw horses in different positions or movements. This is a couple of pages from an A5 notebook. I did rough versions in pencil, then used Sharpie pens in different colours to show the numbers that make up the frame. I have also shown the angle of the starting 2 above the sketches in each drawing.
Tip:
Learn the sequence of footfalls in the gaits. I have seen beautifully rendered drawings and paintings of horses, but the sequence is wrong so the legs are in the wrong position. This gives a ‘something is off’ feel to the artwork. In the top right of my notebook the horse is in trot, as the legs are moving in diagonal pairs. Bottom left, the draught horse is walking – left hind; left fore; right hind; right fore. Bottom right, the horse is galloping, which has the same sequence as walk. These diagrams may help you remember the sequences. Each sequence starts with the left hind, so if your horse is starting with the right hind, then you have to swap sides. Note: These are the sequences for dressage-based gaits. Some gaited horses have different sequences.
Know the gaits

How to continue your drawing
A lot of people will give up at this stage, and that is why they never achieve (what they think is) a good drawing. To just use line to make a convincing drawing takes a lot of skill and experience. Shading will help the drawing to make more sense, and cover some of the construction lines. This can also be simplified into three stages, which is quicker than working on a small area at a time. Working over the whole area also gives more control of the tonal balances over the whole piece.
Shading in three stage
Three stage shading works by first lightly shading over all the areas that are not light. To help me decide this I have identified the light source with a little symbol, top left. We can correct our drawings at any stage. In stage one, you can see that I changed the hind legs – while the flowing angles worked in the sketch, the more realistic angles work better in the shaded drawing. In the second stage, we identify the darkest parts of the drawing and put those in by either cross hatching (lines crossing at right angles to the original lines), or by pencil pressure. I edited, by making the belly lower and added a rough line under the horse’s hooves called an establishing shadow. This places the horse on the ground rather than floating in the air. The third stage uses the pencil, a finger or an eraser to blend the transitions between light, mid and dark tones. We can also ‘lift’ some lighter areas with an eraser. You can see that most of the construction lines are now covered or erased.
Stage One | Stage Two | Stage Three
Pencils come in different grades. The usual ones you buy are HB, but you can also get H pencils which are harder and grey in colour, or B pencils which are softer and darker. I mostly use a 2H, H, B, 3B and 6B in my sketchbook, but my drawing here uses an HB pencil on printer paper.
Tip:
Sharpen your pencil when you want it darker. You can also dip the lead in water to get it darker still, but once wet, it is harder to erase and, if too wet, it will make your paper wrinkle. The paper can also tear easily when wet, so I used the side of the lead rather than the point.
So there you have an easy way to draw a horse. Of course, it is not the only way of drawing, and in workshops I teach ten ways to work and at least four ways of shading. Given time I could teach 50 ways to draw! Hopefully this method will give you a start and some confidence to explore by yourself to find the way of drawing that suits you.
Happy sketching!
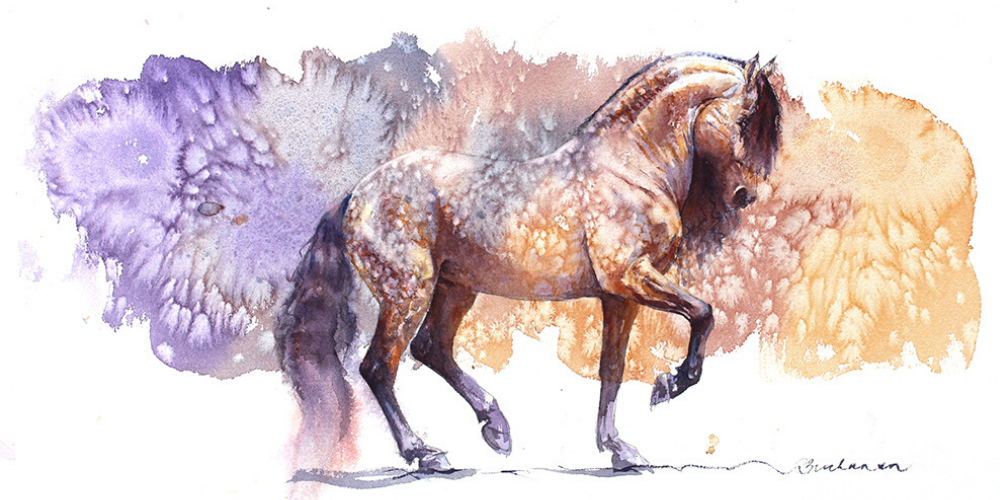
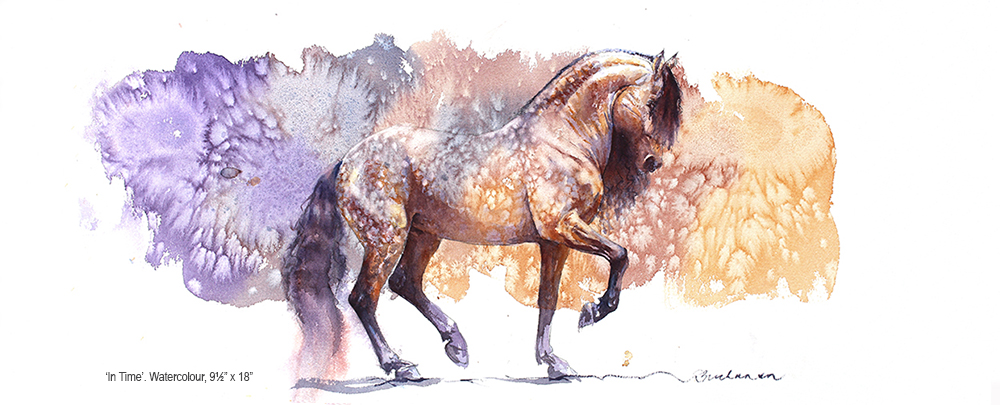
In time – watercolour 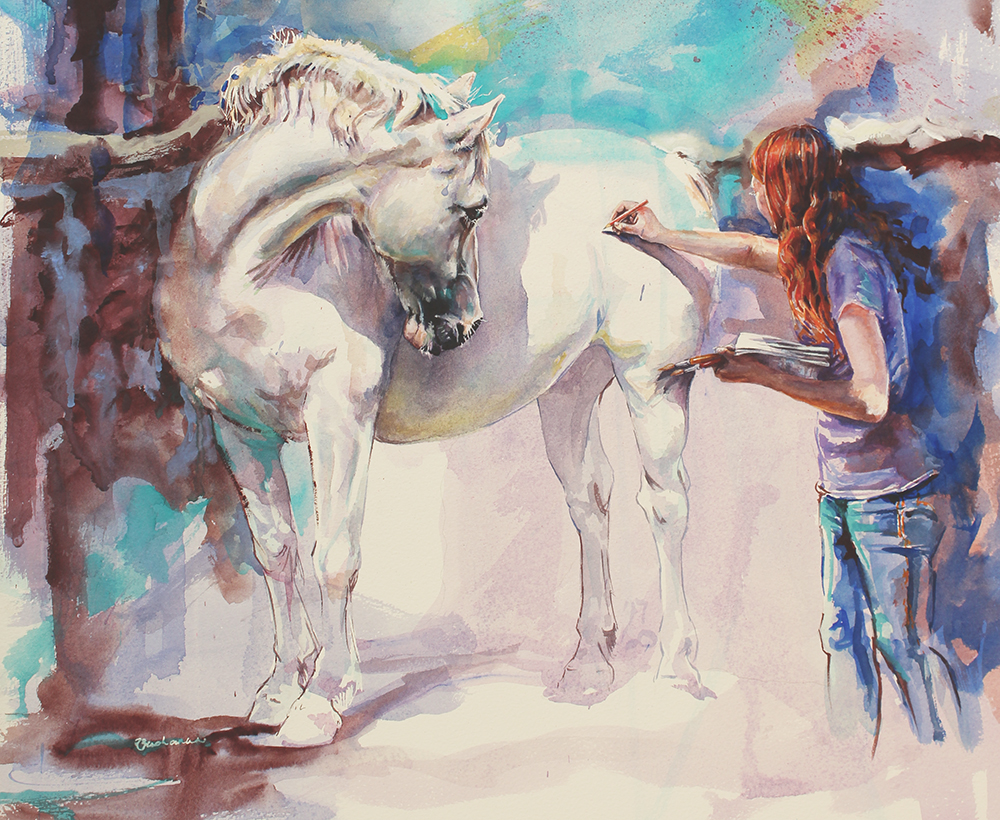
Horse drawn
Author – Ruth Buchanan BA(hons), SEA, IEA
One of the earliest things that Ruth remembers drawing as a child was a horse. She also remembers sitting at the back of maths classes, drawing horses with her friends. That fascination remained with her throughout her previous careers both in graphic design and as a college lecturer, and she says, it was inevitable that she would be true to her childhood obsession, becoming a full-time artist in 2001 with a specialism in horses and people.
Ruth exhibits at International Horse Shows and Events, as well as in galleries, and has been selected five times as one of fourteen artists to represent British watercolour painting at the Annual International Festival of Watercolour, Fabriano in Aquarello, Italy. Ruth has won awards for her art and her sketchbooks and Ruth’s work features in the private collections of notable names from the spheres of The Arts and Equestrianism in the UK, Europe, America and the UAE.
Ruth’s painting is underpinned by strong drawing, and her appreciation of form, light and movement is based on her frequent study of drawing from life: horses, humans and other animals. She was promoted to Full Member of the Society of Equestrian Artists in 2016 and is a member of the Association of Animal Artists and has taught workshops for both organisations. Ruth also writes demonstration articles for Art Magazines in the UK and the USA. Her book, Hoof, Hide and HeART: The Art of Drawing and Painting Animals was published in 2019. Ruth undertakes a limited number of commissioned paintings each year.
Contact details:
Artist website: www.ruthbuchanan.co.uk
(Ruth’s paintings, news and details about the artist)
Published work e-commerce site: www.horsedrawn.co.uk
(prints and greetings cards from Ruth’s work and her book)

Recent Posts
 The real cause of seasonal itching in horses2 July 2026Why some horses still itch despite doing everything right The frustrating reality You’re feeding ...
 Why AI is now the biggest marketing challenge for Equestrian Businesses30 June 2026What Horse Owners are asking ChatGPT instead of Google, and why it matters for your business” ...
 When is the best season for buying a horsebox19 September 2025Beating the Spring Rush! As the autumn leaves begin to fall and the days grow shorter, many horse ...